Wednesday, June 18, 2014

Recap

A lot of time has passed since I last updated this blog.  I apologize and will quickly recap!  Most proudly and importantly, I finished up my Beginning Women's Farmer class in May 2013 and loved it!  It was one of the best courses I've ever taken.  I learned so much and met such wonderful unique independent women, it was awesome.  This class gave me the confidence to leap forward in pursuing our dream and now goal of living on a working farm.  This class helped me discover with Bob, is that it's a goal we both share.  I love feeding off of his enthusiasm, and vise versa.  It's something to share and learn and debate and oh fun! 
 
In 2013, I sold jams and seasonal veggies at a small farm stand co-operated with a neighbor and jams at numerous craft fairs throughout the season.  I realized I love attending craft fairs, they attract a good group of people, both vendors and customers alike.  Therefore, my 2014 goal is to get into a farmer's market along with attending some of my favorite craft fairs too.  The best of both worlds!
 
The challenge is that I'm very much behind schedule this year due to an injury.  Despite having all of these great aspirations to hit the ground running early this year, being on crutches has slowed me down.  I can't get in the garden, can barely crutch in the yard, it's a bummer all around.  While it's disappointing and heartbreaking, the only thing I can do is heal up and go from there.  This seems to be one of those situations where despite all of your best plans, life happens.  So life, once I heal up, watch out!    

Tuesday, June 18, 2013

Spring 2013 - Renting an Excavator for Another Barn Renovation

This Spring we rented an excavator to dig the foundation footers for barn #1, which is closest to the house, and will eventually be parking for one vehicle and a tractor, along with Bob's workshop and storage.  Jacking the barn up to dig the footers was no easy feat!  We had it jacked up from the center....

... and a few days before the excavator was to be delivered, one of the jacks blew out, and the barn fell about 8 inches!  Upon falling, the barn also rotated or twisted off the foundation.  Talk about nightmare!  We called the rental company, but because they were booked up, so we could only delay the rental by a few days.  So Bob worked furiously in getting the barn back up in the air in time.  This time Bob scabbed together beams, built sill plates, and jacked the barn up from the bottom.  Sure, sounds easy, but jacking up in frost, snow, rain and mud is tedious, dirty, annoying work.  Believe me, tossing a match on the barn was contemplated numerous times!  Anyhow, we got it back up on the beams, and then using an old trick my Dad told us about, we soaped down the beams. Then Bob pushed with the bucket of the tractor from behind the barn, and from a cable that we anchored on the wall hooked to my hitch, I used my Subaru to pull the barn from the front.  Slowly but surely, we pushed/pulled that barn on an angle, and it slid right back into place on the foundation.  Of course, I didn't get any pics during this fiasco, it was just get-er-done time! 

Then it was excavator time!  You can see below that Bob is digging on the north side of the barn, where there was still a ton of frost in the ground, mid-April! 


A few years back, we trenched power and heat tubing out from our indoor wood boiler which heats our house.  You can see the gray conduit and orange tubing running through the footer trench below.


While digging the footers on the barn, we noticed that at about one foot depth, there was a fill layer of old trash.  You can see an old wooden barrel metal, along with other random metal junk.  We found a few old leather shoes, bottles, and lots of broken glass, pottery and rusty metal.  It felt like we were archeologists, uncovering clues into this farm's past!  The coolest thing we found was a bottle of sarsaparilla, with the cork still fully intact, and with a little sarsaparilla in it!


To get our money's worth on the excavator rental, we put hours on the machine to dig two ponds, one for my koi fish, that are living in a fish tank in my living room since we moved from the old place, and the other as a duck pond.  (I've always wanted ducks!)  I got time on the machine, and dug this pond hole all by myself!  See that big rock, I wrestled that out of the hole, and yep, rock is staying right there, it's too big to move anymore, but it makes a nice seat! 

 
The aftermath of renting an excavator is that there are holes and dirt piles everywhere, and the lawn is all torn up. 

Saturday, October 6, 2012

We be jammin!

With all of our seasonal bounty of produce from our garden, I've been making jams like a mad woman in the kitchen.  I've been experimenting with different recipes to use up whatever excess produce we've have on hand from turning into compost waste.  After several weeks of jamming, we had enough jam varieties for our first sales event. 

Cautious, but optimistic, I set up a table in a tent in my friend's backyard in Warrensburg for the "World's Largest Garage Sale".  This is an annual town-wide event where the town is inundated with tourists, antique dealers, vendors, junk collectors, and hoarders all looking to either sell or score their unique items.  Granted, it was downright miserable weather for a garage sale.  It was cold and rainy the whole weekend.  Straight from Friday through Sunday, it was socked right in.  I was wearing thermals and plenty of layers to stay warm!  Given the poor weather, the event wasn't as well attended as years past. 

We offered free tastings to see what folks liked or didn't like, to obtain general feed back.  I was most impressed with the warm reception of the volunteer tasters with their honesty, kindness, and helpful suggestions.  For instance, this year was the year of the cucumber.  Not sure why, but we've been overrun with them.  Burnt on pickling, I found a cucumber lime jam recipe to try.  I have to say, it's a highly unique taste.  My husband Bob loves it because it's not so sweet, it has more of a tangy limey bite to it instead.  Some of the friendly taste testers offered suggestions to serve it with Caronas (fab idea!) or with tortilla chips (another fab idea!).  I personally was ready to scrap it all together, but after receiving the helpful feedback, I'm going to assume that it just takes someone with a discerning palate to enjoy. 

 More surprisingly, the best selling flavors at the event were the Garlic and Onion Jam, followed by  the Cantaloupe Jam, and then the Bluebarb Jam!  Who knew!  I would have guessed the Raspberry or Blueberry Jams would have been the winners.  Needless to say, I am so grateful to my friends and the generous taste testers and buyers who made A & B Farm's first sales event a huge success!  I am so happy with the results, that I'm going to get jammin and crank out some more and new recipes to gear up for another event in the next few weeks! 

Monday, August 20, 2012

Renovating Old Barns

Old barns are awesome.  There's no other way to describe them.  They are purely functional outbuildings built for agricultural purposes, usually either for livestock, machinery or feed storage.  Touring them, you can almost walk back in history to catch a glimpse of a mostly bygone era.  Most barns aren't pretty, as there are no frills or decoration applied.  It's all about function.  One can view the lofts, livestock pens, and building components to decipher their use.  Unfortunately, barns are often neglected, especially with the advent of industrialization, abandoning the fields in pursuit of a factory or office job.  In turn, some of the old barns were converted into garages or work shops, or quite frequently, junk storage.          

We have four old dilipated barns on our property.....

....and Bob has decided to fix up the one in the worst condition first.  It was a rabbit hutch and chicken coop, or at least that's what we can determine.  It's the oldest, with peg and beam construction.  It's also the smallest one, so you think it'd be easy, right?  Hardly!  Restoring an old barn doesn't seem worth it.  There's so much hard work involved, it'd be much cheaper and easier to just tear them down and build anew.  The wood siding was shot and the foundation, what little foundation there was, needed a complete overhaul.  Literally the front of the barn sunk into the earth as it rotted away from years of harsh Adirondack weather beatings.  Even the front door was immobile because it was embedded in the ground.


There's something to be said for restoring an old barn.  Our society has become such a disposable society, and old barns are more of a rare novelty these days, with "exposed" barn beams all the rage in houses today.  To imagine that people are buying barns for the sole purpose of tearing them down to recycle them into decorative beams, picture frames and you name it, is beyond me.  An old barn, even if it is not on a historic registry, simply can never be replaced.  They are a direct connection to our past and should be preserved for future generations.  And who knows, pehaps someday be used as their original intention. 

Ha!  I say that now, but it's truly daunting how much work needs to be done before we can use this barn as a small livestock barn.  Bob jacked up the barn, dug footers, and got it plumb and square, reframed portions of the beams that were rotted away, installed sill plates, and reframed as necessary.  There were never any eaves on the barn, so Bob extended the roofline and build eaves.  Then there were two sets of siding on the barn.  Beneath the novelty siding, was an older unstained board and batten siding. 

We decided to keep the board and batten underneath and reside over it with tongue and groove siding Bob found at a really good price from a local saw mill. 


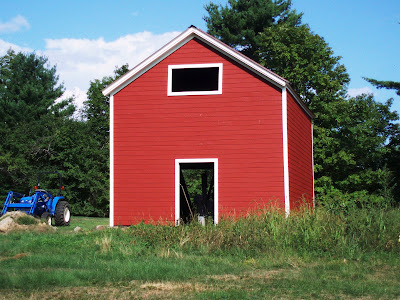
 Then we decided to paint it instead of stain. Bob installed the trim before we painted.  We soon realized it would have been much easier to paint the trim and paint the barn, then install the painted trim on top of the painted barn, instead of trying to cut in every trim board.  Lesson learned! 

Next up, we need to paint and install the windows and doors, and then regrade and finish the foundation.  Also we need to determine whether we want to keep the dirt floor or pour a concrete floor.  This is only the small barn!  We have three more to go and this barn has taken us over a year to get this far....  Ahh, but we wouldn't trade a minute of it!  It's satisfying to look at your work, and know that now this barn will hopefully stand for another 100 years. 

Thursday, June 21, 2012

Introduction

Welcome to the blog of A and B Farm.  We're excited to share with you our trials and tribulations (and hopefully successes) in pursuing our dream.  Our dream of starting a farm.  My husband, Bob, and I bought an old farmhouse two years ago in the southern Adirondacks.  The farm was not a working farm when we bought it.  The house needed alot of work and the barns (while still standing) were dilapidated and dysfunctional, to say the least.  While working full time, we plan to restore the buildings and land to its previous glory of a working Adirondack farm.   

In the past two years, we've been busy tackling projects.  We painted the house, and replaced the old leaking roof.  Back in the day, the pole that carried the power out to the barns fell down, so there was no power in the barns when we moved in.  Since then, Bob has trenched power out and installed a breaker box in the first barn closest to the house.  We installed a garden, and fenced it in to keep the deer and our gubby dogs out.  

We did almost all of this before and in preparation of our backyard wedding last September.  Because we didn't have a house warming party when we moved in, we were delighted to be able to share our farmstead with family and friends on our wedding day.  A peek of our wedding pics

We hope to continue our project list and get some barnyard critters soon, to be profiled in future posts.  Stay tuned!